U9C 自定义页面
原创2025年2月5日大约 1 分钟
按U9的开发模式开发页面非常的复杂。
因此可以通过外挂的方式实现相同的功能。
注意
开发的控制器名称可能与系统自带的控制器名称重复,因此注意区分
创建控制器
提示
引用:X:\yonyou\UBFCE\U9.VOB.Product.UBF\UBFStudio\Runtime\System.Web.Mvc.dll
[AllowAnonymous]
public class TestController:Controller
{
    public ActionResult Index()
    {
        return View("~/Test/Index.cshtml");
    }

    public ActionResult GetJson()
    {
        var d = new
        {
            name = "测试",
            value = 100,
        };
        return Json(d, JsonRequestBehavior.AllowGet);
    }
}
部署控制器
将dll文件部署在X:\yonyou\U9CE\Portal\bin目录下
打开X:\yonyou\U9CE\Portal\MvcControllerConfig.config
添加自定义开发的控制器
<controller controllerName="test" assemblyType="UFIDA.U9.MVC.TEST.TestController,UFIDA.U9.MVC.TEST" />创建Razor页面
由于反射加载自定义控制器,因此自定义页面也是一样。
因此可以先通过VS Code开发Html页面,并设计调试好最终效果。
将页面头部添加@inherits System.Web.Mvc.WebViewPage并重命名cshtml
最终将页面部署在U9C目录下
@inherits System.Web.Mvc.WebViewPage
@using System.Web.Mvc.Html;
@using UFSoft.UBF.MVC;
<!DOCTYPE html>
<html lang="en">
<head>
<script type="text/javascript" src="~/Scripts/jquery.js"></script>
<script>
$(function () {
$.get("../test/GetJson", {}, function (data) {
$.each(["name", "value"], function (i, m) {
$("#" + m).text(data[m]);
})
})
});
</script>
</head>
<body>
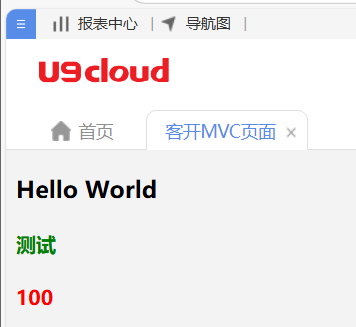
<h3>Hello World</h3>
<h4 style="color:green" id="name"></h4>
<h4 style="color:red" id="value"></h4>
</body>
</html>部署Razor页面
打开X:\yonyou\U9CE\Portal目录,按照Index动作内的视图路径进行配置
集成U9C菜单
新建菜单,在URL上填写:full:mvc/controller前缀/action名称
例如:full:mvc/test/index