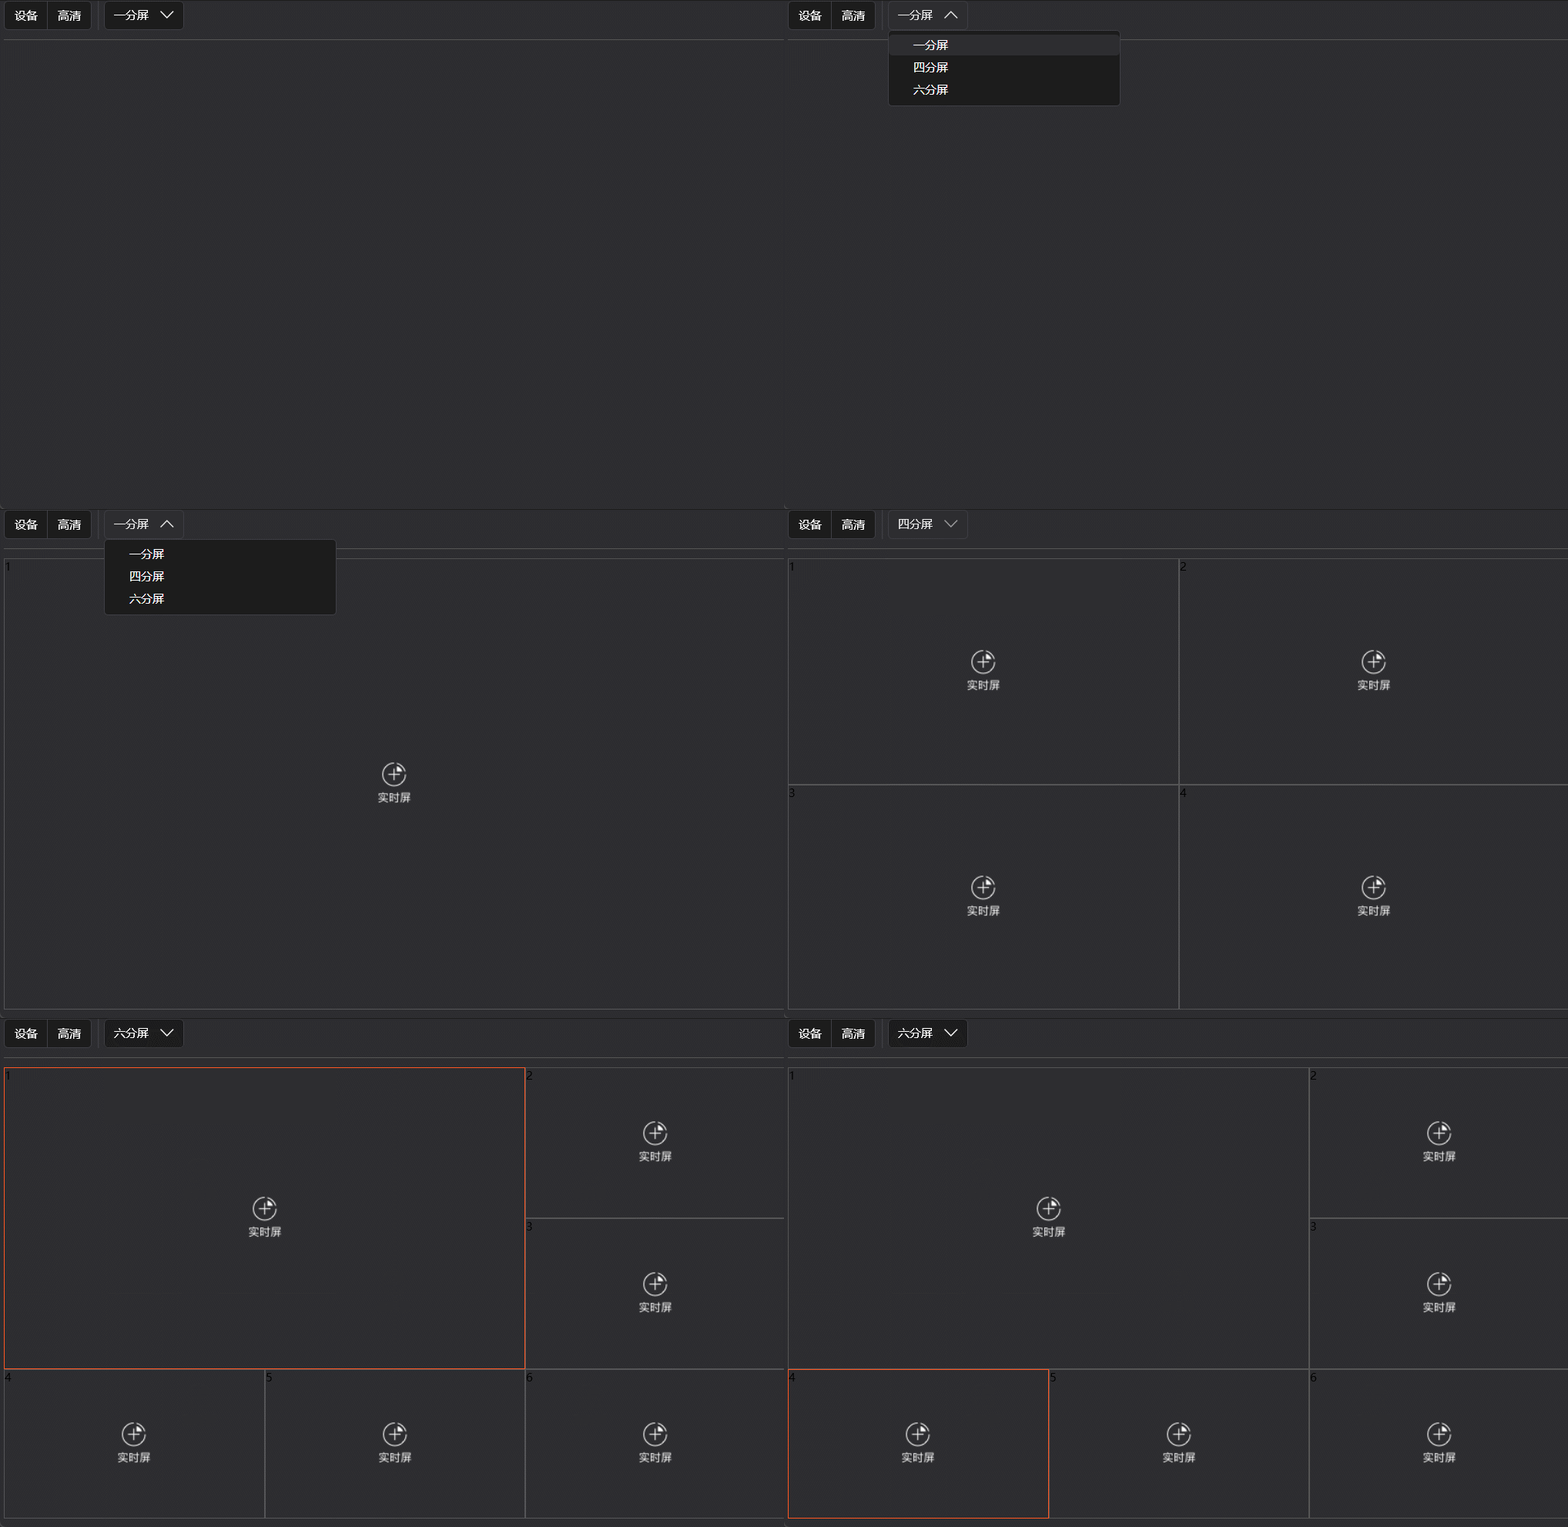
不等布局
原创2023年10月20日大约 3 分钟
WPF提供了控件样式,供自己定制化需求。
但是有个别特殊需求时,需要在重复生成时控件,显示不同的效果或者大小。
以海康视频布局,一分屏、四分屏、六分屏为例。

通过代码方式
通过代码方式进行布局,不在WPF范围考虑之内。
通过固定布局的方式
通过写固定的一分屏,四分屏,六分屏三种用户控件,这种也不再考虑范围之内
通过Style方式
为了批量生成,利用ItemsControl或者ListBox控件进行样式调整。
因为ListBox带IsSelected属性,利用这个进行改造。
提示
使用了Prism
定义模型
VideoModel.cspublic class VideoModel:BindableBase{ private int _index = 0; public int Index { get { return _index; } set { SetProperty(ref _index, value); } } private string _playImg = ""; public string PlayImg { get { return _playImg; } set { SetProperty(ref _playImg, value); } } ... }绑定模型
MainViewModel.cspublic class MainViewModel{ public ObservableCollection<VideoModel> Items { get;private set; } public MainViewModel(){ Items = new ObservableCollection<VideoModel>(); } }基本布局,主页面
MainView.xmal<Grid> <ListBox ItemsSource="{Binding Items}"/> </Grid>添加
DataTemplate,设计显示样式注意
这里有两个关键点,代码高亮处。
- 使用
Grid进行布局,为了切换默认图片和实际视频播放 Grid使用了Transparent透明背景色,解决当选中时修改边框颜色不生效的问题
<DataTemplate x:Key="VideoItemTemplate" DataType="{x:Type ListBoxItem}"> <Grid Background="Transparent"> <TextBlock Text="{Binding Index}" /> <Image Width="48" Height="48" HorizontalAlignment="Center" VerticalAlignment="Center" Source="{Binding PlayImg}"/> </Grid> </DataTemplate>- 使用
添加
ItemsPanelTemplate,设置Item容器提示
使用
Grid作为Item的容器,并设置六行六列,正好同时满足1、4、6分屏的需求。<ItemsPanelTemplate x:Key="VideoItemPanelTemplate"> <Grid> <Grid.ColumnDefinitions> <ColumnDefinition /> <ColumnDefinition /> <ColumnDefinition /> <ColumnDefinition /> <ColumnDefinition /> <ColumnDefinition /> </Grid.ColumnDefinitions> <Grid.RowDefinitions> <RowDefinition /> <RowDefinition /> <RowDefinition /> <RowDefinition /> <RowDefinition /> <RowDefinition /> </Grid.RowDefinitions> </Grid> </ItemsPanelTemplate>设置
ListBoxItem样式,添加边框及选择效果<Style x:Key="VideoItemContainerStyle" TargetType="{x:Type ListBoxItem}"> <Setter Property="Cursor" Value="Hand" /> <Setter Property="Template"> <Setter.Value> <ControlTemplate TargetType="{x:Type ListBoxItem}"> <Border x:Name="PART_HIK_BORDER" BorderBrush="{StaticResource #979797}" BorderThickness="1"> <ContentPresenter /> </Border> <ControlTemplate.Triggers> <Trigger Property="IsSelected" Value="True"> <Setter TargetName="PART_HIK_BORDER" Property="BorderBrush" Value="Red" /> </Trigger> </ControlTemplate.Triggers> </ControlTemplate> </Setter.Value> </Setter> </Style>应用
ListBox,最终布局MainView.xaml<Grid> <ListBox ItemContainerStyle="{StaticResource VideoItemContainerStyle}" ItemTemplate="{StaticResource VideoItemTemplate}" ItemsPanel="{StaticResource VideoItemPanelTemplate}" ItemsSource="{Binding Items}" /> </Grid>调试效果
实际运行发现并没有达到要求,全部挤在了
0行0列中。理论没有问题,关键是如果将每个数据模板内容,放在指定的行列中。
只要添加几行代码进行位置绑定即可
完善
ListBoxItem样式提示
Grid的Row、RowSpan、Column、ColumnSpan为依赖属性,可以绑定VMBinding中的Row、RowSpan、Column、ColumnSpan为VideoModel.cs的属性。<Style x:Key="VideoItemContainerStyle" TargetType="{x:Type ListBoxItem}"> <Setter Property="Grid.Row" Value="{Binding Row}" /> <Setter Property="Grid.RowSpan" Value="{Binding RowSpan}" /> <Setter Property="Grid.Column" Value="{Binding Column}" /> <Setter Property="Grid.ColumnSpan" Value="{Binding ColumnSpan}" /> ... </Style>
其他方式
与通过Grid进行分割布局类似。也是利用ListBox进行改造。
问题在于如何修改每个内容的实际大小。
这个可以利用继承Panel类,通过ArrangeOverride和MeasureOverride方法计算,绘制出实际的大小。