旋转动画
在做主题控件时,涉及到了Loading加载控件,无从下手,本着学习的目的,参考了HandryOrg。
发现HC的Loading是通过代码方式实现,为了学习以及简化的目的,通过XAML方式一步一步梳理。

添加Canvas
ClipToBounds裁剪多余的部分
<Canvas
    Width="100"
    Height="100"
    Background="Gray"
    ClipToBounds="True">
</Canvas>
添加圆点
<Ellipse
    Width="10"
    Height="10"
    Fill="Red" />
如何让这个点进行圆形运动,并且各个点运动轨迹有重力感?
除了利用路径运动。
HC使用了旋转的方式,圆点不管怎么旋转还是圆点。
因此,在圆点外包装一层Border,设置Border大小与Canvas一致,设置Ellipse在Border中下方。
<Border
    Width="100"
    Height="100"
    BorderBrush="Purple"
    BorderThickness="1">
    <Ellipse
        Width="10"
        Height="10"
        HorizontalAlignment="Center"
        VerticalAlignment="Bottom"
        Fill="Red" />
</Border>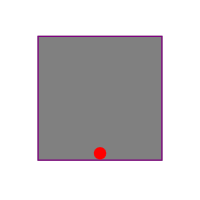
通过RenderTransformOrigin属性设置旋转的中心点。
 <Border
     Width="100"
     Height="100"
     BorderBrush="Purple"
     BorderThickness="1">
     <Border.RenderTransformOrigin>
         <Point X="0.5" Y="0.5" />
     </Border.RenderTransformOrigin>
     <Ellipse
         Width="10"
         Height="10"
         HorizontalAlignment="Center"
         VerticalAlignment="Bottom"
         Fill="Red" />
</Border>通过RenderTransform属性设置旋转角度
 <Border
     Width="100"
     Height="100"
     BorderBrush="Purple"
     BorderThickness="1">
     <Border.RenderTransform>
         <TransformGroup>
             <RotateTransform Angle="30" />
         </TransformGroup>
     </Border.RenderTransform>
     <Border.RenderTransformOrigin>
         <Point X="0.5" Y="0.5" />
     </Border.RenderTransformOrigin>
     <Ellipse
         Width="10"
         Height="10"
         HorizontalAlignment="Center"
         VerticalAlignment="Bottom"
         Fill="Red" />
 </Border>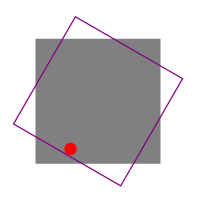
通过改变Angle的值,产生了让圆点按圆形运动的效果,并且WPF支持动画。
匀速运动
通过动画更改Angle的值,产生圆点运动的效果。
这里用到Storyboard和DoubleAnimationUsingKeyFrames
因为要让圆点能产生重力感,就需要对关键帧的进行精确的控制。
LinearDoubleKeyFrame让圆点按线性运动
Storyboard.TargetName="PART_Dot1":附加属性设置需要动画的目标元素
Storyboard.TargetProperty="(UIElement.RenderTransform).(TransformGroup.Children)[0].(RotateTransform.Angle)":附加属性设置目标元素下的具体属性
<LinearDoubleKeyFrame KeyTime="0" Value="0" />:设置在0秒时,圆点的Angle的角度为0
<LinearDoubleKeyFrame KeyTime="00:00:4" Value="720" />:设置在4秒时,圆点的Angle的角度为720
<Storyboard
    RepeatBehavior="Forever">
    <DoubleAnimationUsingKeyFrames Storyboard.TargetName="PART_Dot1" Storyboard.TargetProperty="(UIElement.RenderTransform).(TransformGroup.Children)[0].(RotateTransform.Angle)">
        <LinearDoubleKeyFrame KeyTime="0" Value="0" />
        <LinearDoubleKeyFrame KeyTime="00:00:4" Value="720" />
    </DoubleAnimationUsingKeyFrames>
</Storyboard>
按照第一个点,在添加其他4个点,并且设置每个点的初始角度。
<Border
    x:Name="PART_Dot1"
    Width="100"
    Height="100"
    BorderBrush="Purple"
    BorderThickness="1">
    <Border.RenderTransform>
        <TransformGroup>
            <RotateTransform Angle="0" />
        </TransformGroup>
    </Border.RenderTransform>
    <Border.RenderTransformOrigin>
        <Point X="0.5" Y="0.5" />
    </Border.RenderTransformOrigin>
    <Ellipse
        Width="10"
        Height="10"
        HorizontalAlignment="Center"
        VerticalAlignment="Bottom"
        Fill="Red" />
</Border>
<Border
    x:Name="PART_Dot2"
    Width="100"
    Height="100"
    BorderBrush="Blue"
    BorderThickness="1">
    <Border.RenderTransform>
        <TransformGroup>
            <RotateTransform Angle="-20" />
        </TransformGroup>
    </Border.RenderTransform>
    <Border.RenderTransformOrigin>
        <Point X="0.5" Y="0.5" />
    </Border.RenderTransformOrigin>
    <Ellipse
        Width="10"
        Height="10"
        HorizontalAlignment="Center"
        VerticalAlignment="Bottom"
        Fill="Orange" />
</Border>
<Border
    x:Name="PART_Dot3"
    Width="100"
    Height="100"
    BorderBrush="Green"
    BorderThickness="1">
    <Border.RenderTransform>
        <TransformGroup>
            <RotateTransform Angle="-40" />
        </TransformGroup>
    </Border.RenderTransform>
    <Border.RenderTransformOrigin>
        <Point X="0.5" Y="0.5" />
    </Border.RenderTransformOrigin>
    <Ellipse
        Width="10"
        Height="10"
        HorizontalAlignment="Center"
        VerticalAlignment="Bottom"
        Fill="Yellow" />
</Border>
<Border
    x:Name="PART_Dot4"
    Width="100"
    Height="100"
    BorderBrush="Orange"
    BorderThickness="1">
    <Border.RenderTransform>
        <TransformGroup>
            <RotateTransform Angle="-60" />
        </TransformGroup>
    </Border.RenderTransform>
    <Border.RenderTransformOrigin>
        <Point X="0.5" Y="0.5" />
    </Border.RenderTransformOrigin>
    <Ellipse
        Width="10"
        Height="10"
        HorizontalAlignment="Center"
        VerticalAlignment="Bottom"
        Fill="Green" />
</Border>
<Border
    x:Name="PART_Dot5"
    Width="100"
    Height="100"
    BorderBrush="Red"
    BorderThickness="1">
    <Border.RenderTransform>
        <TransformGroup>
            <RotateTransform Angle="-80" />
        </TransformGroup>
    </Border.RenderTransform>
    <Border.RenderTransformOrigin>
        <Point X="0.5" Y="0.5" />
    </Border.RenderTransformOrigin>
    <Ellipse
        Width="10"
        Height="10"
        HorizontalAlignment="Center"
        VerticalAlignment="Bottom"
        Fill="Blue" />
</Border>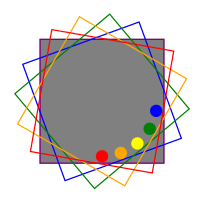
按上面步骤设置每个点的动画。
初具成效
移除每个Border的边框及颜色,设置Canvas的ClipToBounds为True
因此要对每个圆点的动画进行微调,设置每个圆点动画在零时的角度与初始角度一致
<Storyboard
    RepeatBehavior="Forever">
    <DoubleAnimationUsingKeyFrames Storyboard.TargetName="PART_Dot1" Storyboard.TargetProperty="(UIElement.RenderTransform).(TransformGroup.Children)[0].(RotateTransform.Angle)">
        <LinearDoubleKeyFrame KeyTime="0" Value="0" />
        <LinearDoubleKeyFrame KeyTime="00:00:4" Value="720" />
    </DoubleAnimationUsingKeyFrames>
</Storyboard>
<Storyboard
    RepeatBehavior="Forever">
    <DoubleAnimationUsingKeyFrames Storyboard.TargetName="PART_Dot2" Storyboard.TargetProperty="(UIElement.RenderTransform).(TransformGroup.Children)[0].(RotateTransform.Angle)">
        <LinearDoubleKeyFrame KeyTime="0" Value="-20" />
        <LinearDoubleKeyFrame KeyTime="00:00:4" Value="720" />
    </DoubleAnimationUsingKeyFrames>
</Storyboard>
<Storyboard
    RepeatBehavior="Forever">
    <DoubleAnimationUsingKeyFrames Storyboard.TargetName="PART_Dot3" Storyboard.TargetProperty="(UIElement.RenderTransform).(TransformGroup.Children)[0].(RotateTransform.Angle)">
        <LinearDoubleKeyFrame KeyTime="0" Value="-40" />
        <LinearDoubleKeyFrame KeyTime="00:00:4" Value="720" />
    </DoubleAnimationUsingKeyFrames>
</Storyboard>
<Storyboard
    RepeatBehavior="Forever">
    <DoubleAnimationUsingKeyFrames Storyboard.TargetName="PART_Dot4" Storyboard.TargetProperty="(UIElement.RenderTransform).(TransformGroup.Children)[0].(RotateTransform.Angle)">
        <LinearDoubleKeyFrame KeyTime="0" Value="-60" />
        <LinearDoubleKeyFrame KeyTime="00:00:4" Value="720" />
    </DoubleAnimationUsingKeyFrames>
</Storyboard>
<Storyboard
    RepeatBehavior="Forever">
    <DoubleAnimationUsingKeyFrames Storyboard.TargetName="PART_Dot5" Storyboard.TargetProperty="(UIElement.RenderTransform).(TransformGroup.Children)[0].(RotateTransform.Angle)">
        <LinearDoubleKeyFrame KeyTime="0" Value="-80" />
        <LinearDoubleKeyFrame KeyTime="00:00:4" Value="720" />
    </DoubleAnimationUsingKeyFrames>
</Storyboard>
发现在运动一段时间后,圆点重叠了,虽然每个点的动画在起时时角度不一样,但是在终止时间4秒的角度都是720度。
因此需要调整每个圆点在4秒时的角度,设置RepeatBehavior为Forever,这样动画开始点与结束点形成完整闭环并重复运行
<Storyboard
    RepeatBehavior="Forever">
    <DoubleAnimationUsingKeyFrames Storyboard.TargetName="PART_Dot1" Storyboard.TargetProperty="(UIElement.RenderTransform).(TransformGroup.Children)[0].(RotateTransform.Angle)">
        <LinearDoubleKeyFrame KeyTime="0" Value="0" />
        <LinearDoubleKeyFrame KeyTime="00:00:4" Value="720" />
    </DoubleAnimationUsingKeyFrames>
</Storyboard>
<Storyboard
    RepeatBehavior="Forever">
    <DoubleAnimationUsingKeyFrames Storyboard.TargetName="PART_Dot2" Storyboard.TargetProperty="(UIElement.RenderTransform).(TransformGroup.Children)[0].(RotateTransform.Angle)">
        <LinearDoubleKeyFrame KeyTime="0" Value="-20" />
        <LinearDoubleKeyFrame KeyTime="00:00:4" Value="700" />
    </DoubleAnimationUsingKeyFrames>
</Storyboard>
<Storyboard
    RepeatBehavior="Forever">
    <DoubleAnimationUsingKeyFrames Storyboard.TargetName="PART_Dot3" Storyboard.TargetProperty="(UIElement.RenderTransform).(TransformGroup.Children)[0].(RotateTransform.Angle)">
        <LinearDoubleKeyFrame KeyTime="0" Value="-40" />
        <LinearDoubleKeyFrame KeyTime="00:00:4" Value="680" />
    </DoubleAnimationUsingKeyFrames>
</Storyboard>
<Storyboard
    RepeatBehavior="Forever">
    <DoubleAnimationUsingKeyFrames Storyboard.TargetName="PART_Dot4" Storyboard.TargetProperty="(UIElement.RenderTransform).(TransformGroup.Children)[0].(RotateTransform.Angle)">
        <LinearDoubleKeyFrame KeyTime="0" Value="-60" />
        <LinearDoubleKeyFrame KeyTime="00:00:4" Value="660" />
    </DoubleAnimationUsingKeyFrames>
</Storyboard>
<Storyboard
    RepeatBehavior="Forever">
    <DoubleAnimationUsingKeyFrames Storyboard.TargetName="PART_Dot5" Storyboard.TargetProperty="(UIElement.RenderTransform).(TransformGroup.Children)[0].(RotateTransform.Angle)">
        <LinearDoubleKeyFrame KeyTime="0" Value="-80" />
        <LinearDoubleKeyFrame KeyTime="00:00:4" Value="640" />
    </DoubleAnimationUsingKeyFrames>
</Storyboard>
加减速运动
在初期动画中,设置了圆点动画在4秒的时间线性转动720度。
因此进一步的细分,并添加EasingDoubleKeyFrame实现缓动动画,并且利用PowerEase实现加速与减速效果。
圆点起点在下方,顺时针运动。
0秒:圆点角度为0°。即0秒时圆点在正下方0°方向
0.4秒:圆点角度为180°。即在0.4秒时在0°方向从下往上顺时针减速运动到在正上方180°方向
1.6秒:圆点角度为220°。即在1.4秒时在正上方180°方向线性运动到右上方220°方向
2秒:圆点角度为360°。即在2秒时在右上方220°方向顺时针加速运动到正下方0°方向
2.4秒:圆点角度为540°。即在2.4秒时,第二圈开始,在0°方向从下往上顺时针减速运动到在正上方180°方向
3.6秒:圆点角度为580°。即在3.6秒时,第二圈开始,在正上方180°方向线性运动到右上方220°方向
4秒:圆点角度为720°。即在4秒时,第二圈开始,在右上方220°方向顺时针加速运动到正下方0°方向
 <Storyboard
     RepeatBehavior="Forever">
     <DoubleAnimationUsingKeyFrames Storyboard.TargetName="PART_Dot1" Storyboard.TargetProperty="(UIElement.RenderTransform).(TransformGroup.Children)[0].(RotateTransform.Angle)">
         <LinearDoubleKeyFrame KeyTime="0" Value="0" />
         <EasingDoubleKeyFrame KeyTime="00:00:0.4" Value="180">
             <EasingDoubleKeyFrame.EasingFunction>
                 <PowerEase EasingMode="EaseOut" />
             </EasingDoubleKeyFrame.EasingFunction>
         </EasingDoubleKeyFrame>
         <LinearDoubleKeyFrame KeyTime="00:00:1.6" Value="220" />
         <EasingDoubleKeyFrame KeyTime="00:00:2" Value="360">
             <EasingDoubleKeyFrame.EasingFunction>
                 <PowerEase EasingMode="EaseIn" />
             </EasingDoubleKeyFrame.EasingFunction>
         </EasingDoubleKeyFrame>
         <EasingDoubleKeyFrame KeyTime="00:00:2.4" Value="540">
             <EasingDoubleKeyFrame.EasingFunction>
                 <PowerEase EasingMode="EaseOut" />
             </EasingDoubleKeyFrame.EasingFunction>
         </EasingDoubleKeyFrame>
         <LinearDoubleKeyFrame KeyTime="00:00:3.6" Value="580" />
         <EasingDoubleKeyFrame KeyTime="00:00:4" Value="720">
             <EasingDoubleKeyFrame.EasingFunction>
                 <PowerEase EasingMode="EaseIn" />
             </EasingDoubleKeyFrame.EasingFunction>
         </EasingDoubleKeyFrame>
     </DoubleAnimationUsingKeyFrames>
 </Storyboard>
其他四个点也是一样设置,注意每个原点的角度。
设置启动时间
虽然所有圆点的角度不一样,但是所有的动画开始时间一致。
因此正对每个圆点添加启动时间,最前面的先启动,每个圆点运动间隔0.12秒
圆点1:启动时间0秒
圆点2:启动时间0.12秒
圆点3:启动时间0.24秒
圆点4:启动时间0.36秒
圆点5:启动时间0.48秒
<Storyboard
    x:Key="Dot2"
    BeginTime="00:00:0.12"
    RepeatBehavior="Forever">
    <DoubleAnimationUsingKeyFrames Storyboard.TargetName="PART_Dot2" Storyboard.TargetProperty="(UIElement.RenderTransform).(TransformGroup.Children)[0].(RotateTransform.Angle)">
        <LinearDoubleKeyFrame KeyTime="0" Value="-20" />
        <EasingDoubleKeyFrame KeyTime="00:00:0.4" Value="160">
            <EasingDoubleKeyFrame.EasingFunction>
                <PowerEase EasingMode="EaseOut" />
            </EasingDoubleKeyFrame.EasingFunction>
        </EasingDoubleKeyFrame>
        <LinearDoubleKeyFrame KeyTime="00:00:1.6" Value="200" />
        <EasingDoubleKeyFrame KeyTime="00:00:2" Value="340">
            <EasingDoubleKeyFrame.EasingFunction>
                <PowerEase EasingMode="EaseIn" />
            </EasingDoubleKeyFrame.EasingFunction>
        </EasingDoubleKeyFrame>
        <EasingDoubleKeyFrame KeyTime="00:00:2.4" Value="520">
            <EasingDoubleKeyFrame.EasingFunction>
                <PowerEase EasingMode="EaseOut" />
            </EasingDoubleKeyFrame.EasingFunction>
        </EasingDoubleKeyFrame>
        <LinearDoubleKeyFrame KeyTime="00:00:3.6" Value="560" />
        <EasingDoubleKeyFrame KeyTime="00:00:4" Value="700">
            <EasingDoubleKeyFrame.EasingFunction>
                <PowerEase EasingMode="EaseIn" />
            </EasingDoubleKeyFrame.EasingFunction>
        </EasingDoubleKeyFrame>
    </DoubleAnimationUsingKeyFrames>
</Storyboard>
关键帧动画
通过ObjectAnimationUsingKeyFrames对元素对象进行动画处理。
之前动画是在4秒内运动两圈,因此继续添加动画效果,由于不显示圆点,相当于吞噬效果,因此所有点的隐藏、显示、隐藏时间都相同
0.12秒:圆点显示
4秒:圆点不显示,即运动两圈后隐藏
4.4秒:圆点不显示,即运动两圈后隐藏0.4秒
设置所有圆点初始状态隐藏
 <Border
     x:Name="PART_Dot3"
     Width="100"
     Height="100"
     Visibility="Collapsed">
     <Border.RenderTransform>
         <TransformGroup>
             <RotateTransform Angle="-40" />
         </TransformGroup>
     </Border.RenderTransform>
     <Border.RenderTransformOrigin>
         <Point X="0.5" Y="0.5" />
     </Border.RenderTransformOrigin>
     <Ellipse
         Width="10"
         Height="10"
         HorizontalAlignment="Center"
         VerticalAlignment="Bottom"
         Fill="Yellow" />
</Border><ObjectAnimationUsingKeyFrames Storyboard.TargetName="PART_Dot3" Storyboard.TargetProperty="(UIElement.Visibility)">
<DiscreteObjectKeyFrame KeyTime="00:00:0.12">
<DiscreteObjectKeyFrame.Value>
<Visibility>Visible</Visibility>
</DiscreteObjectKeyFrame.Value>
</DiscreteObjectKeyFrame>
<DiscreteObjectKeyFrame KeyTime="00:00:4">
<DiscreteObjectKeyFrame.Value>
<Visibility>Collapsed</Visibility>
</DiscreteObjectKeyFrame.Value>
</DiscreteObjectKeyFrame>
<DiscreteObjectKeyFrame KeyTime="00:00:4.4">
<DiscreteObjectKeyFrame.Value>
<Visibility>Collapsed</Visibility>
</DiscreteObjectKeyFrame.Value>
</DiscreteObjectKeyFrame>
</ObjectAnimationUsingKeyFrames>
完整示例
<UserControl ...>
    <UserControl.Resources>
        <Storyboard
            x:Key="Dot1"
            BeginTime="00:00:00"
            RepeatBehavior="Forever">
            <DoubleAnimationUsingKeyFrames Storyboard.TargetName="PART_Dot1" Storyboard.TargetProperty="(UIElement.RenderTransform).(TransformGroup.Children)[0].(RotateTransform.Angle)">
                <LinearDoubleKeyFrame KeyTime="0" Value="0" />
                <EasingDoubleKeyFrame KeyTime="00:00:0.4" Value="180">
                    <EasingDoubleKeyFrame.EasingFunction>
                        <PowerEase EasingMode="EaseOut" />
                    </EasingDoubleKeyFrame.EasingFunction>
                </EasingDoubleKeyFrame>
                <LinearDoubleKeyFrame KeyTime="00:00:1.6" Value="220" />
                <EasingDoubleKeyFrame KeyTime="00:00:2" Value="360">
                    <EasingDoubleKeyFrame.EasingFunction>
                        <PowerEase EasingMode="EaseIn" />
                    </EasingDoubleKeyFrame.EasingFunction>
                </EasingDoubleKeyFrame>
                <EasingDoubleKeyFrame KeyTime="00:00:2.4" Value="540">
                    <EasingDoubleKeyFrame.EasingFunction>
                        <PowerEase EasingMode="EaseOut" />
                    </EasingDoubleKeyFrame.EasingFunction>
                </EasingDoubleKeyFrame>
                <LinearDoubleKeyFrame KeyTime="00:00:3.6" Value="580" />
                <EasingDoubleKeyFrame KeyTime="00:00:4" Value="720">
                    <EasingDoubleKeyFrame.EasingFunction>
                        <PowerEase EasingMode="EaseIn" />
                    </EasingDoubleKeyFrame.EasingFunction>
                </EasingDoubleKeyFrame>
            </DoubleAnimationUsingKeyFrames>
            <ObjectAnimationUsingKeyFrames Storyboard.TargetName="PART_Dot1" Storyboard.TargetProperty="(UIElement.Visibility)">
                <DiscreteObjectKeyFrame KeyTime="00:00:0.12">
                    <DiscreteObjectKeyFrame.Value>
                        <Visibility>Visible</Visibility>
                    </DiscreteObjectKeyFrame.Value>
                </DiscreteObjectKeyFrame>
                <DiscreteObjectKeyFrame KeyTime="00:00:4">
                    <DiscreteObjectKeyFrame.Value>
                        <Visibility>Collapsed</Visibility>
                    </DiscreteObjectKeyFrame.Value>
                </DiscreteObjectKeyFrame>
                <DiscreteObjectKeyFrame KeyTime="00:00:4.36">
                    <DiscreteObjectKeyFrame.Value>
                        <Visibility>Collapsed</Visibility>
                    </DiscreteObjectKeyFrame.Value>
                </DiscreteObjectKeyFrame>
            </ObjectAnimationUsingKeyFrames>
        </Storyboard>
        <!--其他四个动画-->
    </UserControl.Resources>
    <Grid>
        <Canvas
        x:Name="PART_Container"
        Width="100"
        Height="100"
        Background="Gray"
        ClipToBounds="True">
        <Border
            x:Name="PART_Dot1"
            Width="100"
            Height="100"
            Visibility="Collapsed">
            <Border.RenderTransform>
                <TransformGroup>
                    <RotateTransform Angle="0" />
                </TransformGroup>
            </Border.RenderTransform>
            <Border.RenderTransformOrigin>
                <Point X="0.5" Y="0.5" />
            </Border.RenderTransformOrigin>
            <Ellipse
                Width="10"
                Height="10"
                HorizontalAlignment="Center"
                VerticalAlignment="Bottom"
                Fill="Red" />
        </Border>
        <!--其他四个点-->
        <Canvas.Triggers>
            <EventTrigger RoutedEvent="Loaded" SourceName="PART_Container">
                <BeginStoryboard x:Name="PART_Dot1Storyboard" Storyboard="{StaticResource Dot1}" />
            </EventTrigger>
            <EventTrigger RoutedEvent="Unloaded" SourceName="PART_Container">
                <StopStoryboard BeginStoryboardName="PART_Dot1Storyboard" />
            </EventTrigger>
        </Canvas.Triggers>
    </Canvas>
   </Grid>
</UserControl>
小结
使用XAML实现动画效果,但存在很多代码重复。